Yep, I can grow pumpkins on a trellis if I pick small varieties like Sugar Pie or Baby Pam. The heavy varieties won’t work because the weight gets too much to handle up high. I’ll train the vines upward onto sturdy panels made from hog wire attached to T-posts. Once the pumpkins reach golf-ball size, I need to cradle each one in a sling cut from old T-shirts to support the weight as it grows.
This setup gives me some real benefits. More airflow moves around the leaves, which cuts down on fungal diseases like powdery mildew. I also get to grow more pumpkins in a smaller space since I’m using vertical room instead of spreading vines across the ground. The main challenge is making sure those fruit supports stay strong as the pumpkins get bigger and heavier.
Yes, Pumpkins Thrive on Trellises: Here’s How

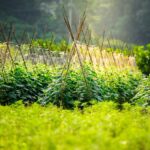
Why spend your garden space growing pumpkins on the ground when you can grow them up? I’ve discovered that trellising really changes how pumpkins grow. Vertical growing improves airflow around the plants, and better airflow reduces disease risk by keeping foliage and fruit elevated off the ground.
I use sturdy hardware like hog panels with T-posts to support the structure. Small to medium varieties like Baby Pam, Jack Be Little, and Sugar Pie work best for trellising. I train the vines early onto the trellis and tie them loosely with twine.
When the fruit reaches golf-ball size, I install slings to cradle and secure it. This method maximizes sun exposure while preventing the vines from breaking under the weight. I’ve found that trellising creates a real difference in my garden’s productivity and health.
Best Pumpkin Varieties for Vertical Growing

Not all pumpkins work well when you grow them vertically, so I pick the right variety to set myself up for success. I go with small to medium pumpkins for trellising instead of the massive types like Mammoth Gold, which are just too heavy for vertical systems.
Baby Pam, Jack Be Little, Sugar Pie, Cinderella, and Small Sugar are my go-to varieties. These smaller types won’t strain my trellis or hog panels. When I grow these recommended varieties, I get better air circulation and sun exposure. I also save valuable garden space.
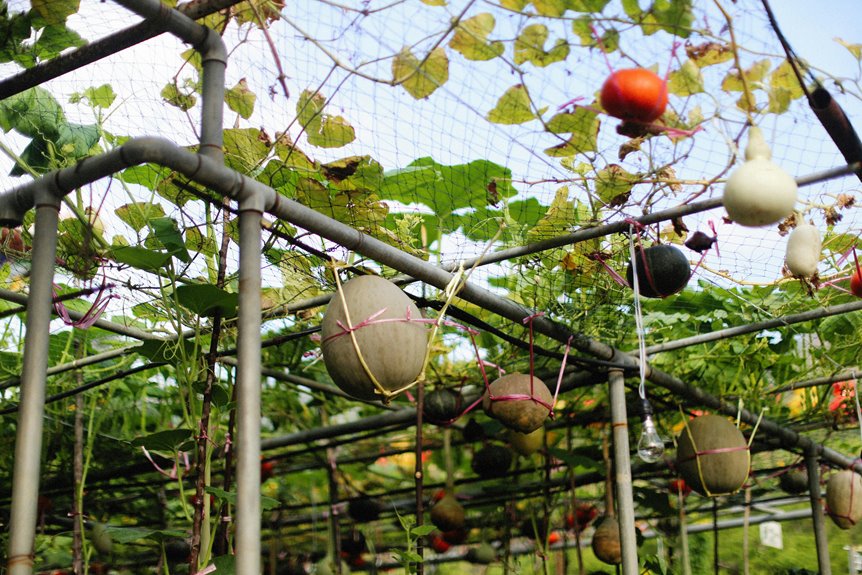
I start training my vines early. Once my fruits reach golf-ball size (about 1.5 inches across), I make fruit slings from old t-shirts or pantyhose. I cut the fabric into strips about 4 inches wide and tie them gently around each developing pumpkin. Then I attach the other end of the sling to the trellis above. This support keeps the weight off the vine and prevents the fruit from snapping the stem as it grows heavier.
How Vertical Trellises Cut Fungal Disease and Double Your Yield Per Square Foot
When I move my pumpkins up onto a trellis, something pretty remarkable happens to my garden’s health and productivity. The vertical setup lets air flow freely around the leaves. This airflow reduces humidity and moisture buildup near the foliage, which means fewer wet leaves and less room for fungal diseases like powdery mildew and blight to take hold.
Trellising also transforms how I use my space. I can pack plants closer together since growth concentrates upward instead of sprawling sideways. This denser arrangement effectively doubles my yield per square foot compared to ground planting.
I support the developing fruit with slings made from old t-shirts or garden mesh. These slings prevent fruit from breaking and keep pumpkins off the soil where disease lives.
Combining trellising with drip irrigation and mulch creates solid protection against fungal pressure while maximizing my harvest.
Choosing the Right Support Structure for Your Trellis
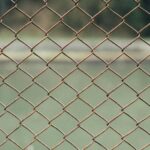
I’ve learned that picking the right trellis materials and design really matters when you’re growing heavy pumpkins vertically. I go with something durable, like a hog panel (that’s a sturdy wire panel that’s 16 feet long and 34 inches wide). I attach it to 4-foot T-posts using heavy-duty clips to keep everything secure.
The spacing and dimensions matter too. I need to give my vines enough room to climb and spread out as they grow. When I get these basics right from the start, I save myself a lot of trouble later when those pumpkins get heavy and start putting real stress on the structure.
Trellis Material Options
What makes a trellis strong enough to hold a heavy pumpkin? I’ve found that hog panels work best for this job. These panels measure 16 feet long and 34 inches wide, so I get plenty of space for vines to climb. I secure them between two 4-foot T-posts using heavy-duty clips.
This setup creates a sturdy arch that won’t buckle under weight. The clips hold everything in place during wind and growth. I pair the hog panels with heavy-duty T-posts because they’re designed to handle serious load-bearing.
I avoid placing my trellis against walls that need repairs or paint. I also add extra anchors for wind protection. This combination gives me confidence that my pumpkins stay safe and supported throughout the season.
Structural Durability Requirements
Your trellis needs to handle serious weight, so I pick the right materials from the start. I use heavy-duty hog or cattle panels paired with 4-foot steel T-posts. I secure everything with heavy-duty clips that won’t slip under pressure.
I drive those posts at least 6 inches deep into the ground, preferably a full foot. This depth keeps my entire structure from toppling when wind hits or fruit gets heavy. Shallow posts will fail fast, so I don’t skip this step.
I build my frame with curves or uprights that spread weight evenly across the structure. This design keeps stress from concentrating on single points. I add guy lines (cables or ropes that angle from the top of the frame to the ground) and extra anchors around the base for wind reinforcement.
Space and Dimension Planning
Once I’ve got my posts driven deep and my frame reinforced, I need to figure out how much space my pumpkins actually need to grow upward. I space my trellis panels about 18 to 24 inches apart. This gives my vines room to climb without crowding each other. I want my trellis structure standing at least 5 to 6 feet tall, which is plenty of height for smaller varieties like Jack Be Little or Sugar Pie pumpkins. I also consider the width. A standard hog panel spans about 16 feet, which works great when I bend it into an arch. I position my T-posts firmly into the ground before anchoring everything down. Getting these measurements right helps me create the right growing environment for my vertical pumpkin garden.
Starting Pumpkin Seeds Indoors vs. Direct Sowing Outdoors

How I start my pumpkin seeds really shapes what I get at harvest time. I’ve got two solid approaches to choose from, and each one works for different situations.
| Method | Timing | Best For |
|---|---|---|
| Indoor Start | 3–4 weeks before warm weather | Controlled seedlings |
| Direct Sow | When temps exceed 50°F | Faster results |
| Hybrid Approach | Staggered timing | Extended harvest |
Starting seedlings indoors gives me a head start on the season. I fill 4×4 seed cells with compost-rich soil mixed with manure. I set up heat mats and clear domes on my sunny windowsill to keep things warm. Once half my seeds sprout, I remove the dome so seedlings don’t get leggy. When my plants have 2–3 true leaves (the real leaves that look like pumpkin leaves, not the first round), I harden them off over 7–8 days. This means I gradually move them outside to get used to wind and cooler air before I plant them in the garden.
Direct sowing outdoors works when nighttime temperatures stay above 50°F. I push seeds 12–18 inches deep into the soil. If June rains slow things down and seeds don’t sprout, I plant more by mid-June to catch up. Mixing both methods lets me stagger when seeds sprout and get pumpkins ready at different times throughout fall.
Prep Soil and Build Your Fertilizer Schedule

Why does soil prep matter so much when you’re growing pumpkins on a trellis? I need deep, nutrient-rich soil to support those heavy vines climbing upward. I start by mixing compost into my beds before planting, aiming for 12–18 inches of depth so roots can really establish themselves.
I follow a fertilizer schedule that matches each growth stage. Before planting, I apply balanced 5-5-5 fertilizer with compost. During growth, I water my pumpkins biweekly with fish emulsion or compost tea. When flowers appear, I switch to a 5-10-10 bloom booster. Finally, during fruit development, I add potassium-rich kelp meal or wood ash.
I also mulch around the base to keep moisture steady and stable for root health.
When to Sow Pumpkins for a Fall Harvest

I’ve got two main ways to get pumpkins ready for a fall harvest, and the timing matters for each approach.
The first method is starting seeds indoors. I sow them 3–4 weeks before warm weather arrives using larger 4×4 cells. Once the seedlings show 2–3 true leaves, I harden them off by gradually exposing them to outdoor conditions. Then I move them outside when they’re ready.
The second method is direct-sowing outdoors. I wait until nighttime temperatures stay above 10°C (50°F) consistently. I plant seeds 12–18 inches deep in soil that’s rich with compost. If June gets rainy, I sow again by mid-June to match up with my indoor seedlings for that late September harvest.
Both approaches work well. I pick whichever fits my schedule and what my garden needs that year.
Starting Seeds Indoors Early
When I’m planning to grow pumpkins on a trellis, I need to time my indoor seed start just right. I start my seeds 3–4 weeks before warm weather arrives consistently in my area. This gives me seedlings that are ready to move outside when conditions are right.
I use 4×4 cell trays filled with compost-rich soil for my seeds. Right after sowing, I place a heating mat under the trays and add a dome cover. This helps my seeds germinate faster. A heating mat is just an electric pad that warms the soil to speed up the germination process (that’s when seeds sprout).
I check my trays daily to watch for germination (when about 50% of seeds have sprouted). Once I see those first true leaves forming over 7–8 days, I remove the dome cover. The larger containers give my pumpkin roots plenty of room to develop strong. After the true leaves show up, I gradually harden off my seedlings before moving them outside permanently. Hardening off means slowly getting the plants used to outdoor conditions by placing them outside for a few hours each day, then increasing the time over a week or so.
Direct Sowing Timing Guidelines
Want to skip the indoor seed-starting process? I can direct sow pumpkins straight into the ground instead. I wait until overnight temperatures stay above 50°F before planting.
Timing matters quite a bit. If June rains delay my seeds from sprouting, I’ll resow them by mid-June after waiting about 7 days. This method works especially well when I’m growing pumpkins vertically on a trellis since I can stagger plantings for continuous fall harvests.
Before planting, I prepare my direct sow area by mixing in rich compost. I dig down at least 12 inches deep, ideally 18 inches. This soil depth gives my pumpkin roots plenty of room to develop strong systems.
I often use a hybrid approach instead of choosing just one method. I’ll start some seedlings indoors and direct sow others at the same time. This spreads my harvest across several weeks and gives me more flexibility with my garden schedule.
Guide Vines Onto Your Trellis (Without Snapping Them)

Getting your pumpkin vines onto the trellis early matters. I’m talking about right when those little tendrils first start forming, not later when the stems get thick and woody.
- Use soft ties or insulated copper wire to loosely attach vines to the mesh. I avoid wrapping ties too tight because that stops the vine from growing thicker. Garden clips or twine work too.
- Regularly direct new growth upward. I check my vines every few days and guide them toward higher points on the trellis. I gently move any growth that’s heading toward the edges back toward the center.
- Install fruit slings when pumpkins reach golf ball size. I use a sling made from soft fabric or old pantyhose and tie it directly to the trellis. This supports the weight of the pumpkin as it gets bigger and prevents the stem from snapping under pressure.
Starting early with young vines keeps me from fighting thick, mature growth later. Training the vines as they develop means I’m working with the plant instead of against it. This keeps my pumpkin project moving forward and makes good use of my vertical garden space.
Make DIY Fruit Slings From Old T-Shirts

I’ll show you how to make fruit slings from old t-shirts that’ll cradle your developing pumpkins safely on the trellis. You’ll want to cut strips from the fabric, prepare them properly, and then install them once your pumpkins reach about golf ball size so the vines don’t get stressed.
Start by grabbing an old t-shirt you don’t wear anymore. I like to use 100% cotton shirts because they’re soft and won’t dig into the pumpkin skin. Cut the shirt into strips about 2 inches wide and 12 inches long. You’ll need one strip for each pumpkin you’re supporting.
Next, I tie each strip into a loop using a simple knot at the ends. The loop should be loose enough that I can fit my finger underneath it without forcing it. This keeps the sling from cutting into the pumpkin as it grows.
When your pumpkins are about the size of a golf ball, gently slip the sling around the fruit. I wrap it so the pumpkin sits in the middle of the fabric loop. Then I tie the other end of the loop to a sturdy part of your trellis. Make sure the knot is tight so it won’t slip when the pumpkin gets heavier.
Check your slings every week or so. I loosen them as the pumpkins grow bigger because they need more room. A sling that’s too tight will leave marks on the fruit or cut off its water supply. The goal is to support the weight without restricting anything.
Cutting and Preparing Fabric
Why spend money on special support systems when I’ve got old t-shirts sitting in my closet?
I’m about to turn those forgotten shirts into fruit slings that’ll support my pumpkins next year. Here’s what I need to do:
- Cut a circular neckline opening large enough for the pumpkin to fit through
- Cut two armholes on opposite sides to create attachment points
- Use thicker shirts or layer multiple fabrics for larger pumpkin varieties
I’ll start by laying my shirt flat on a work surface. Using scissors, I’ll carefully cut around the neckline to make it about 4-6 inches in diameter. Next, I’ll cut the armholes wider to form sturdy loops. For bigger pumpkins, I’ll stack two shirts together before cutting to add strength. This prep work takes just a few minutes and gives me the perfect cradle for supporting growing fruit.
Securing Fruit Weight
Once my pumpkins reach about the size of a golf ball, I slip them into fabric cradles. I tie my fruit slings loosely to the trellis using twist ties or twine. This lets the pumpkins move a bit without slipping free.
I check my slings regularly as the pumpkins grow larger. Adjusting them prevents sagging or damage to the fruit. The key is spreading the weight evenly across the sling material so concentrated stress doesn’t break the vine or hurt the pumpkin.
I space my slings carefully to support the entire fruit. Old t-shirts, pantyhose, or garden mesh all work well. These materials cradle the pumpkins safely while I guide them upward on the trellis.
Installation Timing Guidelines
When should you actually make and install those fruit slings? I need to time this right so my pumpkins grow on a trellis without snapping branches.
I start sling creation when fruit reaches golf ball size, about 1.5 inches across. This is the sweet spot because the pumpkin’s still light enough to handle but heavy enough that I know it needs support soon. If I wait much longer, the weight gets out of hand fast.
I craft my slings from old T-shirts or pantyhose. I cut the T-shirts into strips about 2 inches wide and 12 inches long, then stitch them into cradles that look like small hammocks. For pantyhose, I just cut the legs into sections and tie them together. Both materials are soft on the fruit and won’t dig in as the pumpkin grows.
I tie the slings loosely to the trellis using twine or garden clips. Loose is important here because I need to let the pumpkin expand without restriction. I check them every week and adjust as needed, making the slings a bit looser each time the fruit gets bigger.
The key is acting early. Once I wait too long, the fruit gets too heavy to support safely. My DIY approach keeps costs down since I’m reusing old clothes, and my pumpkins stay healthy growing vertically instead of on the ground where they’d rot or get damaged.
How Often to Water Vertical Pumpkins in Heat

How much water do my trellised pumpkins really need when temperatures spike? During hot days, I water up to 10 minutes per session at the base of the plant. If the heat stays high, I hand water twice daily to keep the soil consistently moist. This prevents stress on my vines since pumpkins are heavy feeders that demand steady hydration.
I target the base only and keep the leaves dry to reduce mildew risk. Mildew is a fungal disease that damages leaves and spreads quickly in wet conditions.
In cooler June weather, I rely more on natural moisture and check my soil every few days using the finger test at 2 inches depth. This means I stick my finger into the soil about 2 inches down to feel if it’s dry or moist.
I add mulch and rich compost-based soil to help retain moisture throughout peak heat. Mulch is a layer of material like wood chips or straw that sits on top of the soil and keeps it cooler and moister.
Prune Wayward Shoots and Keep Vines on Track

Why do pumpkin vines sprawl everywhere if you don’t guide them? They waste energy on side shoots instead of putting that effort into fruit production. I need to take control early.
Pumpkin vines sprawl everywhere without guidance, wasting energy on side shoots instead of directing it toward fruit production.
I keep my vertical pumpkins thriving by pruning side shoots regularly. This directs energy toward the main vine growing up the support structure. I train the vines early using twine, garden clips, or insulated copper wire tied loosely to the trellis. The key is checking attachments weekly and adjusting them as vines grow so they don’t cut into the plant or block sunlight from reaching the leaves.
I guide growth by securing vines along the support structure rather than letting them flop free. This prevents breakage of the thick, mature tendrils that develop over time. When pumpkins reach golf ball size, I install fruit slings to cradle them securely on the trellis. Loose ties matter because tight ones damage vines and block photosynthesis, which is the process where plants use sunlight to make food.
I check my setup weekly and make adjustments as needed. This consistent management keeps everything on track.
Prune Lower Leaves and Space Vines to Block Mildew

I’ve found that removing lower leaves from my pumpkin vines really helps keep mildew away. Moisture gets trapped near the ground where fungal infections start, so taking those leaves off makes a difference. I space my vines about 12-18 inches apart on the trellis so air can move freely around them. This helps keep the foliage off the damp soil and lets me guide the growth upward. I check regularly for any spotted leaves and pull them off right away before the mildew spreads to the healthy parts.
Lower Leaf Removal Strategy
When you’re growing pumpkins on a trellis, removing those lower leaves strategically makes a real difference. Here’s what I focus on:
- Remove leaves touching the soil first
- Clear densely shaded foliage next to the vine’s base
- Check progress weekly as fruit expands
I target the lowest 12 to 18 inches of the vine. This opens up airflow underneath your canopy, which dries things out faster after watering. Less moisture means powdery mildew stays away. You’ll notice the difference in plant health.
I’m careful not to strip too many leaves though. Your pumpkin still needs those leaves for energy. We balance airflow against keeping enough green cover for photosynthesis. That’s the real strategy here.
Vine Spacing For Airflow
I space my vines about 12–18 inches apart on the trellis. This matters just as much as pruning lower leaves because tight spacing traps humidity around the plants. When moisture sits there too long, fungal diseases like mildew move in.
I think of spacing as creating air channels through my vertical garden. The goal is to get air flowing freely under the canopy so it circulates around the leaves and stems. Better airflow strengthens the plants and keeps blight away.
On the trellis, I train the vines upward and position branches that produce fruit above the mulch layer. This setup maximizes airflow and reduces soil splash that spreads disease from the ground up. I’m basically building a system where each pumpkin gets breathing room and stays healthier.
Mildew Prevention Techniques
Powdery mildew thrives in dense, humid spots where air doesn’t move. I need to create conditions where it can’t survive.
I start by pruning the lower leaves on my pumpkin vines. This opens up the base and lets air circulate freely around the plant. I also space my vines 12-18 inches apart on the trellis. Leaves dry quickly after rain or watering when they’re not crowded together.
I water only at the soil level, never overhead. This keeps the foliage completely dry throughout the day. I mulch around the base with 2-3 inches of wood chips. The mulch keeps soil moisture steady and stops fungal spores from splashing up onto the leaves.
I use sturdy trellises to guide my vines upward and away from crowded areas where disease spreads easily. By spacing things out, keeping leaves dry, and improving air flow, I’m creating an environment where mildew simply can’t establish itself.
Squash Bugs and Powdery Mildew: Vertical-Specific Prevention

Why does going vertical actually help me fight two of the trickiest pumpkin problems?
I’m tackling powdery mildew and squash bugs at the same time with trellising. Better airflow around vertical plants means leaves dry faster after watering, which starves powdery mildew of the moisture it needs. When pumpkins reach golf-ball size, I start using fruit slings to prevent vine damage that invites squash bugs.
Here’s how I defend my vertical garden: I inspect the undersides of leaves weekly for early powdery mildew spots and squash bug clusters. I keep clean mulch around the trellis bases since dense foliage hides pests. I water consistently to prevent stress that attracts insects. Regular monitoring lets me catch problems before they spread and keeps my vertical garden healthy and productive.
Harvesting and Curing Pumpkins Grown Vertically

Once your vertical pumpkins reach full size and develop that deep orange color, you’re ready to harvest them from the trellis.
I use a sharp knife to cut each pumpkin, leaving about three inches of stem attached to the fruit. I support the pumpkin with my other hand so I don’t stress the vine or trellis. I avoid pulling or ripping vines during the removal process.
After harvesting, I cure my pumpkins in direct sun for about two weeks. The rind (the hard outer skin) hardens during this time, and it becomes less easily punctured. That’s when I know they’re ready for storage.
I then move my cured pumpkins to a warm, dry area with good airflow. This setup maximizes shelf life so I can enjoy my vertical garden’s bounty throughout the season.
Grow Pumpkins in Unexpected Spaces

Growing pumpkins vertically isn’t just about saving space in my main garden. It’s about finding growing opportunities I didn’t know I had. I can turn tight corners and forgotten areas into productive pumpkin patches by using trellises.
I’ve found perfect spots between my raised beds for vertical growth. Against my garage or fence, pumpkins climb upward instead of sprawling outward. Even narrow side yards become functional growing zones when I place trellises strategically.
I start by positioning sturdy trellises in these unconventional spaces. Small varieties like Sugar Pie work best here since they’re lightweight. I guide young vines upward from day one to prevent tangled growth later.
I use fruit slings to keep developing pumpkins secure as they grow. This setup lets me maximize every corner of my property. I’m gardening smarter by working with my space constraints, not against them.